ScienceCluster Training
Science IT Overview
-
We provide computing infrastructure:
- ScienceCloud
- ScienceCluster
- ScienceApps – web-based application portal to the ScienceCluster
- Supercomputer – Eiger partition of the Alps supercomputer (CSCS)
-
We provide support, training, and consulting:
- Application support
- Training to use infrastructure
- Consulting examples:
- Specialized advice for Science IT hardware;
- Assistance with workflows or scripts;
- Scaling up compute work from laptop to cluster;
- Code optimization including porting to GPU or enabling parallelization;
Further info:

Further info:
We manage multiple resource services via an on-premises data center. From this data center, we serve the ScienceCloud and ScienceCluster (as well as ScienceApps).
Hardware Services Summary
| ScienceCloud | ScienceCluster |
|---|---|
| 20000+ vcpus (1vcpu = 1core) Virtual Machines size is at least as large as your laptop: 1-32 vcpus, 4-256GB RAM | generic / "standard" CPU nodes: - 8 vcpus, 30GB RAM; - 32 vcpus, 117GB RAM; - 126 vcpus, 460GB RAM; “parallel” / MPI / Infiniband nodes: - 48 vcpus, 380GB RAM high-mem nodes: - 256 vcpus, 4TB RAM |
| -gpuT4 flavor for the NVIDIA Tesla T4 (1GPU + 8-32 vcpus) | Nvidia Tesla T4 (16GB RAM) Nvidia Tesla V100 (16 or 32GB GPU RAM) Nvidia Tesla A100 (80GB RAM) |
Further info:
Science IT also manages 2 related infrastructure services:
- ScienceApps – web-based interactive application portal (with Jupyter, Rstudio, Matlab, Spark) to the ScienceCluster.
- "Supercomputer" – Eiger partition of the Alps supercomputer (CSCS, Lugano)
- UZH pay-per-use access to Eiger, managed by Science IT (nodes with 128 cores; 2 x AMD Epyc Rome).
- minimum job size is one full node, UZH share is ~200 nodes
- CSCS supercomputer time (GPU nodes of Piz Daint) also available via scientific research proposals (cscs.ch)
Infrastructure Service Summary
| ScienceCloud | ScienceCluster |
|---|---|
| Virtual Machines controlled by the user | A shared cluster environment |
| The user has root (sudo) privileges | Compute resources managed by Slurm |
| Can customize system software | Can install software only in their user directories, and commonly-used software is maintained by Science IT |
| Multiple operating systems are available: Ubuntu Linux or another Linux distribution | Only one operating System is available: Ubuntu Linux |
| Great for interactive use | Great for large batches of jobs (up to thousands jobs submitted at a time) |
Further info:
The ScienceCloud and ScienceCluster are different infrastructure services that have their own advantages and disadvantages. You can find more information on which service is right for you here
How to use ScienceCluster

Upon a successful login, you will arrive at one of the 3 login nodes.
- Don't: execute your code directly on login nodes.
- Do: submit a job to the job scheduler / resource manager (Slurm)
Further info:
The Slurm server sits between the login nodes and the compute resources (i.e., the powerful computers on the cluster) acting as a "Workload Manager Server".
The login nodes are for text editing, file, code and data management on the cluster, as well as basic transfers and the submission of jobs to be run using the compute resources. Nothing computationally intensive should be run on the login nodes.
Warning
Executing or running your code or scripts directly on login nodes will compromise the integrity of the system and harm your own and other users' experience on the cluster.
Note
In the context of computing: a job is an operation or a set of operations, grouped together, treated as a single and distinct unit. Users get to decide what a job is; i.e., running custom programs (your coded scripts) on some data to compute statistics or to produce other data.
Connecting to ScienceCluster
Connecting to a Login Node via command line
-
Connecting to ScienceCluster requires the
sshtool (available on Linux, MacOS, and Windows 10+ command line terminals) -
From one of these terminals, run the following command using your specific UZH shortname:
ssh shortname@cluster.s3it.uzh.ch -
After running this command, you will be prompted for your Active Directory (AD) password (which can be set at https://identity.uzh.ch).
Further info:
After your first log in, you can setup passwordless authentication using SSH keys.
Common issues with the ssh key authentication can be found here.
Warning
Upon a successful login, you will arrive at one of the 3 login nodes. Do not execute or run your code or scripts directly on login nodes. Doing so will compromise the integrity of the system and harm your own and other users' experience on the cluster.
Note
Windows users may benefit from using a full Ubuntu subsystem on their local machine. Consider using the Windows Subsystem for Linux.
Storage overview
| Name | Path | Alias | Backup | Purged | Quota | Notes |
|---|---|---|---|---|---|---|
| home | /home/$USER | ~ | No | No | 15 GB, 100k files | Redundant, SSD |
| data | /data/$USER | ~/data | No | No | 200 GB | Redundant, SSD |
| scratch | /scratch/$USER | ~/scratch | No | 1 month | 20 TB | Redundant, HDD |
| scalable storage | /shares/<PROJECT> | see scalable-storage | No | No | As per cost contribution | Redundant, HDD, Cost contribution |
Further info:
Details on the ScienceCluster filesystem can be found here.
Check the FAQs for support in case of quota issues.
Copy data to/from ScienceCluster
-
Download the
training.taron your local machine: -
From your local machine transfer the file to your scratch filesystem (
~/scratchor/scratch/$USER) on ScienceCluster:scp local_path/training.tar shortname@cluster.s3it.uzh.ch:~/scratch # open/expand the contents of the file tar xvf training.tar
Further info:
You can use
tar tvf training.tarto view the.tarcontents without expanding the files.More details on data transfer directions can be found here.
How to run jobs on ScienceCluster
What is Slurm
- It's the Simple Linux Utility for Resource Management
- Fun fact: the acronym is derived from a popular cartoon series by Matt Groening titled Futurama. Slurm is the name of the most popular soda in the galaxy.

Further info:
Slurm is the tool that you use to submit your jobs to the cluster in a fair and organized way. Without a workload management system like Slurm, clusters could not be shared fairly or efficiently.
How does Slurm work
Further info:
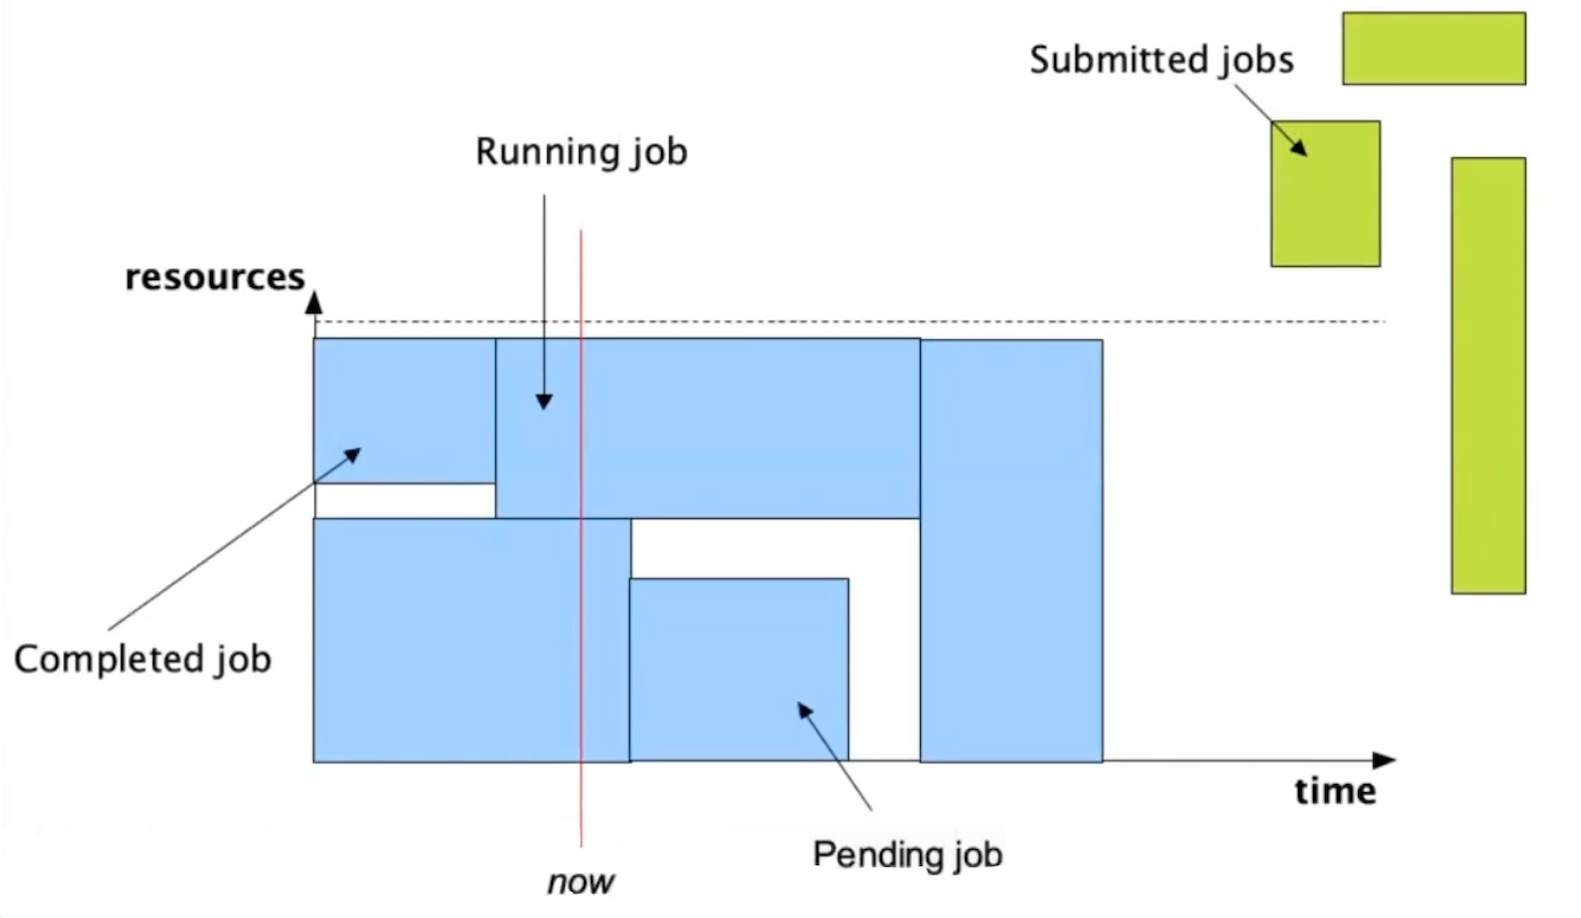
In an abstract way you can view a job as an area or shape, like a square, because it uses some resources over time. The user defines the size of the job by requesting resources and time (the two axes or dimensions that in geometry determine the size of a shape, and in this case the size of a job).
The goal of Slurm as a resource manager is to find a place for the jobs submitted to the cluster based on the resources that we have, which are not infinite.
Therefore Slurm does the following:
- Allocates the requested resources for each job
- Allows finite resources to be shared
- Attempts to share resources fairly
Further info:
When a user submits a job:
- If resources are available, the job starts immediately
- If resources are in-use, the job waits in the queue (status = pending)
To see all currently running jobs on the cluster use
squeue. To see the current state of all nodes usesinfo.
Submission script
- A sample submission script titled
hello.shcan be found within thetraining.tarfile. The script reads as follows:1 2 3 4 5 6 7 8 9 10 11 12 13 14 15 16 17 18 19 20 21 22 23
#!/usr/bin/bash -l

### Comment lines start with ## or #+space
### Slurm option lines start with #SBATCH

### Here are the SBATCH parameters that you should always consider:
#SBATCH --time=0-00:05:00   ## days-hours:minutes:seconds
#SBATCH --mem 3000M         ## 3GB ram (hardware ratio is < 4GB/core)
#SBATCH --ntasks=1          ## Not strictly necessary to include, because default is 1, but necessary to understand!
#SBATCH --cpus-per-task=1   ## Use greater than 1 for parallelized jobs

### Here are other SBATCH parameters that you may benefit from using, currently commented out:
###SBATCH --job-name=hello1 ## job name
###SBATCH --output=job.out  ## standard out file


echo 'hello starting.'

hostname    ## Prints the system hostname

date        ## Prints the system date

echo 'finished'
Further info:
To submit a job using Slurm you need to use a submission script that contains the commands that you want to run. If you are running a script in R, Python, or another data analysis language you will use the submission script to execute your code.
You'll note that the script has three basic parts:
- a shebang line (
#!/bin/bash) that tells the system it's a Bash script (code line 1)- the
sbatchparameter section, which is where you request your resources of interest (code lines 7-10)- the area where you execute your commands of interest (i.e., where you will execute your code) (code lines 18-24)
Every submission script must contain all three parts. Every time you submit a job, you should update the
sbatchparameters to request the resources you need and you should always confirm the code that's being executed.
Warning
Bash variables are not allowed in the sbatch parameters section: bash will not accept them.
Bash commands are not allowed between sbatch parameters: as soon Slurm sees a Bash command it ignores everything that comes afterward.
Note
A task is a process or a unit of program that can be placed on any node. Each unit of program can use multiple CPUs that can be specified by --cpus-per-task
How to submit a compute job
-
Submit the submission script
hello.shusing thesbatchcommand:sbatch hello.sh -
Upon a successful job submission, you will receive a message that reads
Submitted batch job <number>where<number>is the job's assigned ID. The jobID can be used for other operations (i.e., monitoring or canceling the job).
If the resources are available the job starts immediately. If not, it waits in the queue.
Tips on job monitoring
- pending or running jobs:
squeue --jobs jobIDorsqueue --me - completed jobs:
sacct - Look for file written in the directory: since the job is run in batch mode, the output from Slurm is put in a file.
Further info:
With the
hello.shscript you can practice submitting a simple script that uses only Bash commands (e.g.,hostname) to print metadata on the server in the cluster where the job ran, and therefore it needs no customization.More details on job submissions can be found here and more info on job management can be found here.
Warning
Consider using an array if you need to submit a large set of jobs (e.g., 500+), both for the integrity of the system as well as your own efficiency. If each of your individual jobs are less than a few minutes, especially I/O heavy jobs, consider putting them into a single job (i.e., batches of analyses that run sequentially within a script).
Demo on ScienceApps
-
Start a Jupyter session from the browser following the instructions here
-
Run the
squeue --mecommand on ScienceCluster from a terminal:- you'll see the Jupyter session running as a Slurm job
-
You can monitor running jobs using the
sstat -a jobID-
available command fields:
sstat --helpformat -
field description:
man sstat -
example:
sstat -a jobID --format Jobid,MaxRSS,MinCPU,NTasks
-
Further info:
More details about ScienceApps can be found here
Customizing job submissions for your code
Customization process
-
Decide which operation you want to perform and the resources you would need in advance, so that the scheduler finds a place for the job:
-
Command to execute:
python3 ./getpi.py 100(a function to estimate the value of pi) -
Resources needed: 1 core, 3GB RAM for 5 minutes (guesstimates for the first job)
-
Monitoring: use the
sacctto see how tight the resources are when submitting the job
-
Keep in mind:
- Don't: run your code/workflow directly on the login nodes.
- Do: submit jobs to the job scheduler / resource manager (Slurm).
Runtime software environment
The cluster works via a batch system: you submit a job and get the results later. Remember:
-
for a job to run (on a compute node), you must customize the runtime environment (the software that the job has available at runtime)
-
you don't see the job running in real time except if you ask for interactive sessions; i.e., live time access to the compute node, useful when you create the software environment or test your code pipeline
Creating custom runtime environments
-
Nearly all users will need to create custom Python or R virtual environment so the job can access the modules/libraries needed to run the code and process the data.
-
Check the available "modules" on the ScienceCluster (i.e., existing installations of the most common software used by researchers):
module av -
To load a module, use
module load <name>. For example, to load the default version of Anaconda use:module load anaconda3 -
By loading Anaconda, the conda package becomes available. Conda is one of the software environment management tools offered on ScienceCluster to create virtual environments (a place to contain and install all software needed).
Further info:
The module system allows users to customize the software environment that their job uses. Software listed with the
(D)is the default version loaded when not specifying a version number. To list your currently loaded modules, usemodule list. You can unload specific modules usingmodule unload .... You can also clear your modules usingmodule purge.In addition to providing common software for running your research code, the module system is also used when requesting advanced hardware resources like GPUs. Because this specialized hardware requires specialized software that needs to be available at runtime, make sure to load the accompanied software module that supports it. See this GPU job submission section for a specific example.
For the more the technically curious users: loading a module changes/sets environment variables during your session that will give you access to your requested software. In other words, it does something similar to the following Bash commands:
export PATH=directory_of_application_executable:$(PATH)
export LD_LIBRARY_PATH=directory_of_some_library_to_be_used:$(LD_LIBRARY_PATH)
-
Don't: create new conda environments on login nodes as creating an environment requires non-negligible resources and therefore can affect the other users of the login nodes.
-
Do: use an interactive session to create your conda environments.
Creating a Virtual Environment
-
Run an interactive session:
srun --pty -n 1 -c 2 --time=00:30:00 --mem=7G bash -l -
Create and activate a conda virtual environment with Python and pandas installed:
module load anaconda3
conda create --name myenv python=3.12
source activate myenv
conda install anaconda::pandas
conda deactivate # to go back to the system environment
Further info:
The most common use of the cluster's module system is to create and use virtual environments. To create your first virtual environment with Conda/Mamba, follow the directions here.
What is a virtual environment and why/how are they used/useful?
- A tool that allows users to install their desired software in a contained and manageable way (i.e., in your user-space on ScienceCluster)
- Often used for data analysis languages like Python or R
- Specific package versions and dependencies can be installed inside a virtual environment, which can be catalogued for greater reproducibility
- Each virtual environment is completely independent of others, which allows specific versions of packages and/or multiple versions of packages to be handled across different environments
On the ScienceCluster, the default virtual environment tools for new users are Conda and Mamba. A specific guide on using Conda/Mamba can be found here.
For complete control over your software environment, including operating system libraries, use Singularity; a generic guide can be found here, with specific guide of using Singularity on ScienceCluster is found here.
Note
For R users, Conda/Mamba is the recommended way for creating your R environment. Check our R example script for more details about creating an R environment on ScienceCluster.
For Python-based ML programming, a tutorial demonstrating the basics of how to create a Python environment on GPU compute nodes can be found here.
Integrating the virtual environment into your submission script
-
If you would like to use a customized environment in your submission script, simply load the environment before running the command that runs your code.
-
Change the
hello.shsubmission script to the following:#!/usr/bin/bash -l ### Here are the SBATCH parameters that you should always consider: #SBATCH --time=0-00:05:00 ## days-hours:minutes:seconds #SBATCH --mem 3000M ## 3GB ram (hardware ratio is < 4GB/core) #SBATCH --ntasks=1 ## Not strictly necessary because default is 1 #SBATCH --cpus-per-task=1 ## Use greater than 1 for parallelized jobs module load anaconda3 source activate myenv python3 ./getpi.py 100
Further info:
This submission script runs the
getpi.pyscript (within thetraining.tarfile) using themyenvenvironment created here, with the following guesstimate for the resources: 1 core, 3GB RAM for 5 minutes.Submitting the script with
sbatchwould run thegetpy.pyscript for100iterations using themyenvenvironment containing the Python version selected during the environment creation.For reference, the
getpi.pyscript estimates the value of Pi using a Gregory-Leibniz series. You can change100to another (higher) positive integer value to achieve a better approximation of Pi.
Determining the resource requirements
-
Compare the estimated pi results when increasing the number of iterations to 1000000000.
-
Increase the number of CPUs to 2:
sbatch --cpus-per-task 2 getpi.sh # slurm parameters can be set in command line -
Use the
sacctcommand to see how tight the resources are when submitting the job:sacct --format Jobid,ReqMem,MaxRSS,TimeLimit,AllocCPUS,Elapsed,CPUTime,TotalCPU

Where TotalCPU is the actual CPU time consumed by the job and CPUTime is the time allocated to the job (AllocCPUs * Elapsed (Wall-clock time)). If your code is scaling effectively TotalCPU = CPUTime.
In the example above with 2 CPUS, CPU efficiency: TotalCPU/CPUTimes x 100 ~ 42% so this would show that you can request 1 CPU instead of 2 CPUs.
The process of running your code to determine the resource requirements you need to make it run effectively is called benchmarking. Feel free to refer to the Scientific Workflow Course GitLab Repo.
Further info:
You should spend at least a small amount of time benchmarking your code before you scale it across your entire dataset, otherwise your resource requests are made with incomplete information and you may be requesting an inappropriate amount of resources.
Please keep in mind the following notes when selecting your resource requests for each job submission:
- Requesting more than 1 core when you haven't specifically integrated multi-CPU tools in your code will not make your code run faster.
- Requesting more memory than required will also not make your code run faster.
- Only request the CPU and memory resources that you know your code requires.
- Request an amount of time based on your best estimates of how long the code will need plus a small buffer.
- When possible, implement checkpointing in your code so you can easily restart the job and continue where your code stopped.
Science IT teaches a semester course called Scientific Workflows wherein we teach the basics of monitoring and benchmarking. We'll notify users via our Newsletter every time this course is offered, so make sure to read your monthly newsletters from us.
Lesson learned in resource allocation
Resource allocation is an optimization problem: the more resources you request the faster your job can be (if your code is scalable or parallelized), but the longer your job might wait in queue.
For example, a user requests 32 cpus, 2 TB mem, and a time limit of 6 days trying to get the job to finish faster. However, the job ends up in the queue for 5 days because it is hard to obtain 2TB of memory for 6 days.

Job Wall-clock time: 04:40:19
CPU efficiency: TotalCPU/CPUTime * 100 ~ 24%
If the user requested fewer resources (e.g., 16 cpus, 128 GB mem, 1 day), the job would have finished the same day!
Advanced Topics
Understanding priorities and backfilling
Why is my job not running? There is not a single answer!

Priority depends on how many resources you have been using over the time; it is an integer value calculated by Slurm using lots of arithmetic about your recent usage:
- new users have the highest priority value
- if you have just finished a large job you will have a lower priority value
- if you don't use the cluster (e.g., for days or weeks) it will equalize to the original value
Further info:
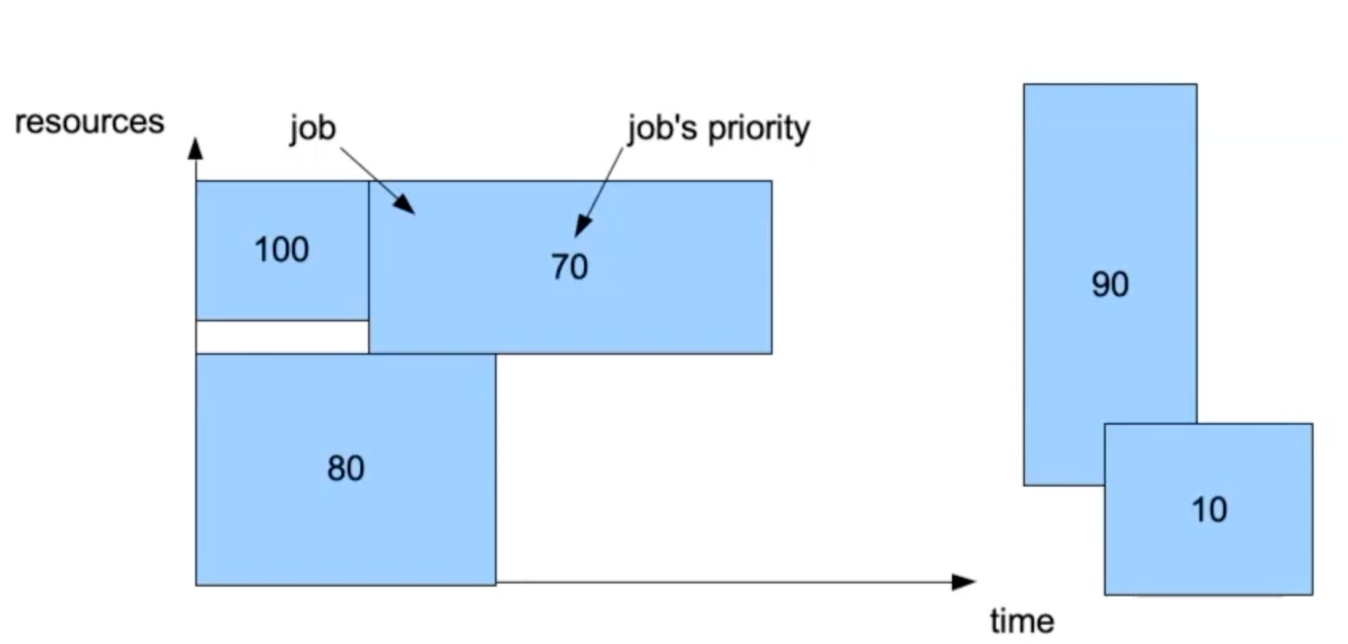
In the abstract representation of a job as a square, a priority value is assigned to each square. You can then expect that jobs with higher priority will run first.
Further info:
Let’s assume we have two more jobs, with priority 90 and 10 respectively.

Further info:
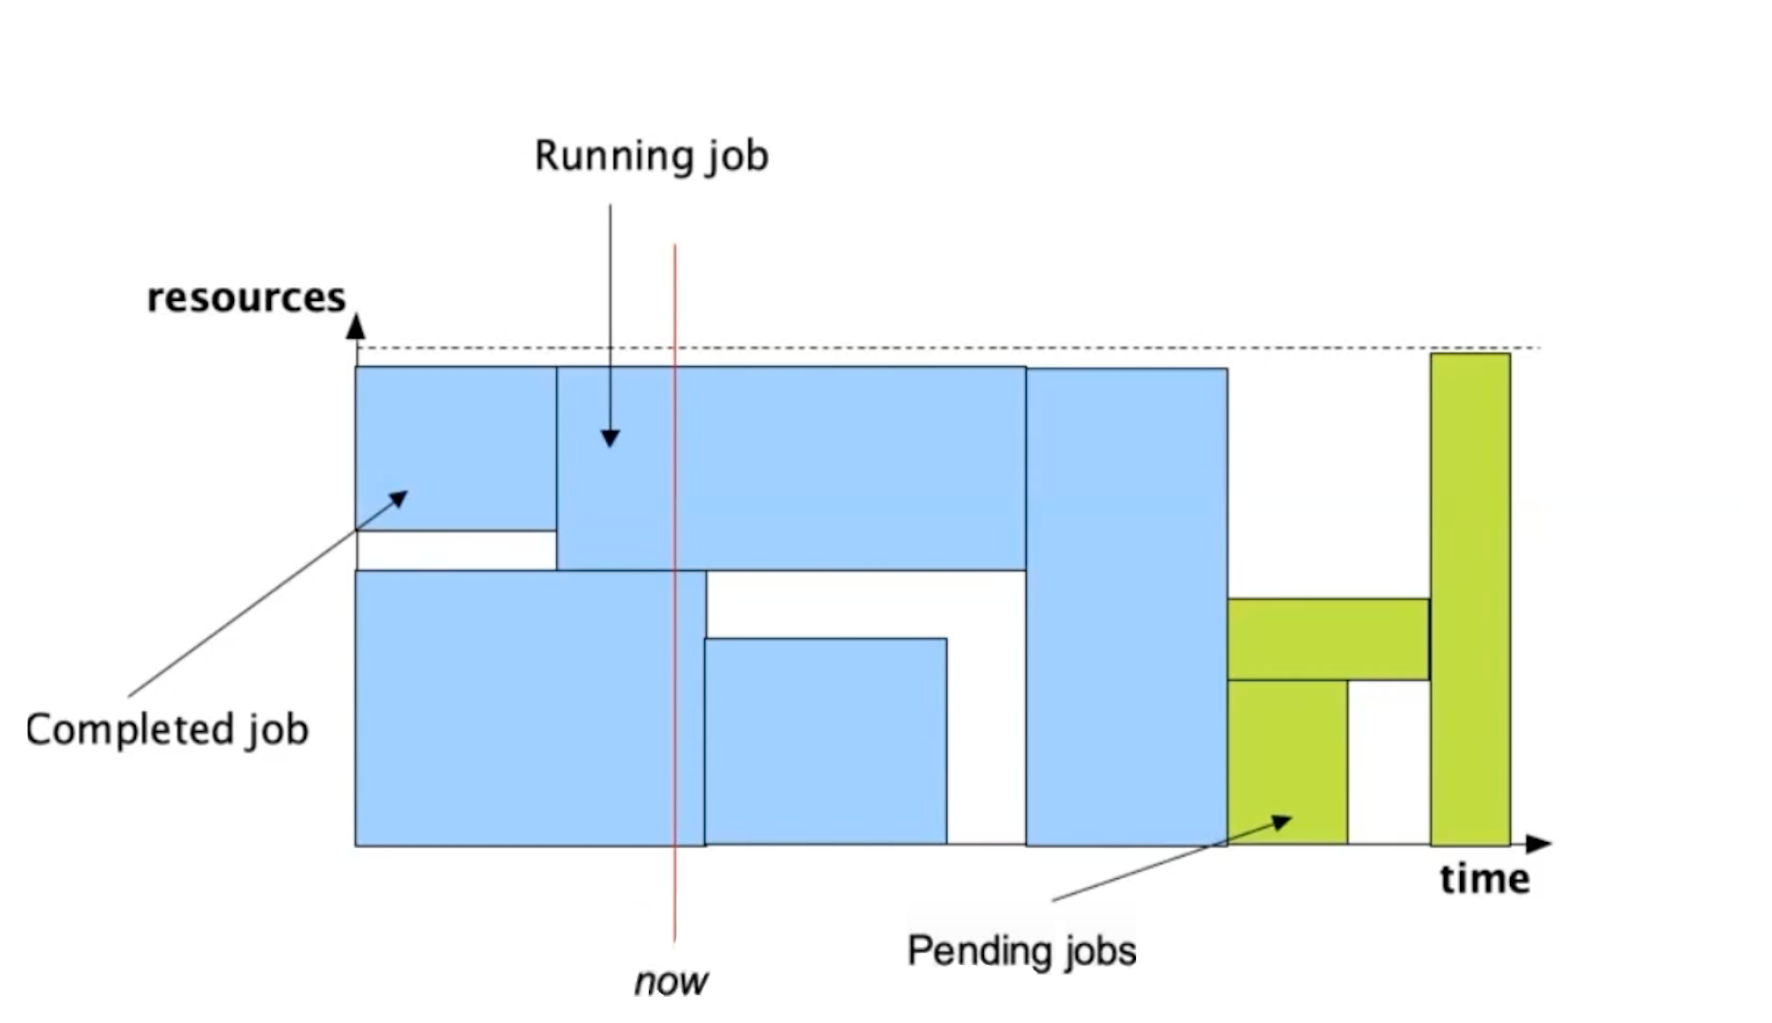
Slurm will select the job with higher priority to run next. However, this job requires a large amount of resources so it cannot start before other jobs are finished and resources are freed. This visually creates a hole in the job queue.

Backfilling: if the small job can start and finish without delaying other higher priority jobs, Slurm will run it.
Further info:
The job with lower priority has fewer requested resources that can fit the hole in the job queue, so Slurm will start it first without delaying the job with higher priority.
Therefore, the tighter the resources, the higher the probability that your jobs will be "backfilled". The order in backfilling is also based on priority.
More information about priority can be found here.
See also the FAQ section When will my job run? in Science IT docs.
GPUs
GPUs can be requested by adding the following parameter to your Slurm submission script:
#SBATCH --gpus=1
You can also request a specific GPU type. For example:
-
#SBATCH --gpus=T4:1for a T4 -
#SBATCH --gpus=V100:1for a V100-
When requesting a specific amount of memory for V100 GPUs add the corresponding constraint:
-
#SBATCH --constraint=GPUMEM32GB
-
-
#SBATCH --gpus=A100:1for an A100
- #SBATCH --gpus=H100:1 for an H100
-
You can load one of the GPU flavor modules before submitting your script, instead of specifying GPU type in your
#SBATCHparameters. -
If you load a GPU flavor module, you only need to specify
#SBATCH --gpus=1in your script.
| GPU flavor modules | Description |
|---|---|
| module load gpu | For regular single-GPU jobs, where you are not concerned about GPU type. |
| module load h100 module load a100 module load v100 module load v100-32g | Job submission limited to H100/A100/V100 nodes. Automatic pre-selection of defaults for the libraries optimised for multi-GPU multi-node workflows (OpenMPI). |
| module load t4 | Job submission limited to T4 nodes. Same version of OpenMPI but compiled without Infiniband support. T4s are meant for single-GPU jobs only. |
| module load multigpu | For multi-GPU and multi-node multi-GPU jobs, to request either V100, A100 or H100 specifically. |
Further info:
You will need to load one of those modules in order to get access to the GPU specific modules such as
cuda,cudnn, andnccl. Most common GPU applications (TensorFlow, PyTorch) use the CUDA GPU runtime library, which will need to be loaded either viamodule load cuda(optionally specifying a version) or loaded/installed via your Conda or Mamba (or Singularity) environment. Please note that CUDA applications are evolving quickly, so there sometimes may be incompatibilities that you must debug during the environment creation process.
Note
Flavor modules are optional. If you do not need any of the GPU specific modules and you only need a single GPU of any type, you could simply include #SBATCH --gpus=1 in your submission script.
Warning
It is recommended to load GPU flavour modules outside of batch scripts. They set constraints that may interfere with resource allocation for job steps. In other words, run module load ... before submitting your job via sbatch.
Additional notes on GPU job submissions can be found here, and a full Python example can be found here.