ScienceCloud (Legacy)
This page refers to the old ScienceCloud and will soon be removed. We are completing migration to the new ScienceCloud. Our support and documentation now focus primarily on the new platform.
5. (Legacy) Create and Manage Networks
ScienceCloud implements a networking service (Neutron), that allows you to create complex network setups on the cloud. This gives the advanced user more flexibility, but also makes things a bit more complicated for the inexperienced user.
This page will guide you through the available options and help you decide how you should configure the network depending on your use case.
What you can do with Neutron
With neutron you have great flexibility when setting up your networking configuration. You can:
- create VMs with more than one network interface
- add or remove a network interface from a VM that is already running
- create private networks
- create routers and connect them to private networks or the public network
- temporarily assign a public IP to a VM
Use cases
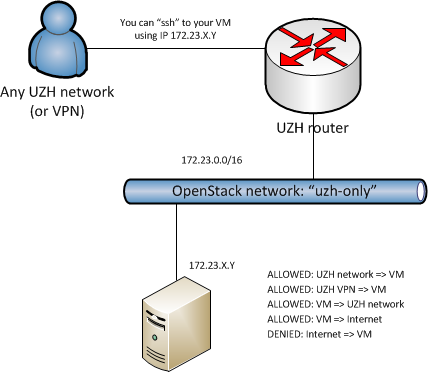
VM Accessible from UZH network only plus internet connectivity
This is the best option if:
- you need to access the VM and copy data to and from the VM via
ssh/scponly from within the university network (or via a UZH VPN) - you don't need to access the VM from outside the university network
This is the default scenario: in this configuration the VM can only be accessed from hosts within the UZH network or connected to the UZH network via a VPN. VMs themselves can still access the internet (for instance, to upgrade the operating system or install new packages) using ANY network protocol and without limitation.
You can also use this configuration when you want to deploy a service that is only accessible from the university network (e.g., a Samba share for your research group)
Info
Please keep in mind that for security reasons we need to track all connections from the VMs and the internet.
How to start a VM with UZH only networking plus internet access
While starting a new VM, in the wizard select the "Networking" tab, and assign the uzh-only network to the first NIC (if it is not already selected).
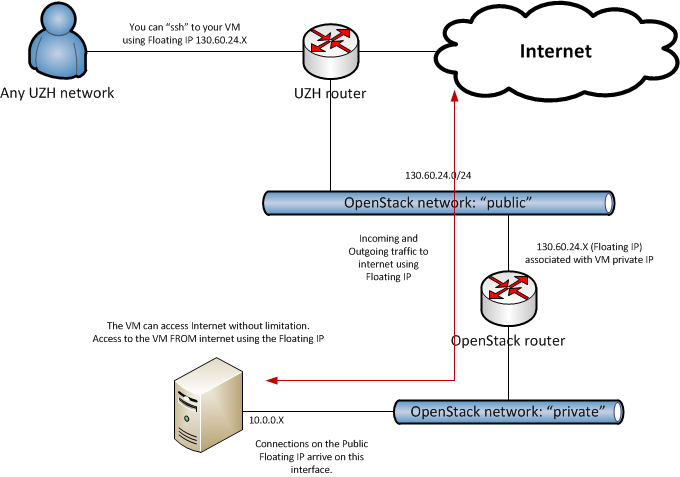
Public access: Floating IP
This is the best option if:
- you need to provide a service for research groups spread around the globe
- your VM is actually a service and not used for computation
This is the network configuration for VMs used to host a publicly available service; e.g., an OpenBIS data management server or a MOOC (like edX).
Info
Based on the Guidelines and Security Rules you are not permitted to host public services for personal or commercial use but only for research purposes.
Science IT Policy for floating IPs
Since the UZH public network uses IPv4 on one side, and these IPs are intrinsically scarce on the other side, each project setup in ScienceCloud has the Floating IP quota set as "0". Therefore if you need to use them we kindly ask you to send your request for an increased Floating IP quota by contacting Science IT with a description of your use case detailing the necessity of using public IPs. Once your request is accepted you will able to see the available floating IPs from ScienceCloud dashboard then proceed with the rest of this tutorial.
How to start a VM with floating IPs
Please note that you can either have only one interface associated to a public IP or you can start from the setup in uzh-only-snat.
In principle, you need to create a private network and a router attached to both the private network and the public network already available on the system. Then you can associate a floating IP to the private IP of your instance. You can later remove the floating IP from the instance and attach it to another instance. In this way, you can use a single floating IP to connect to multiple VMs one at a time.
How to create the private network:
- On the ScienceCloud Web Interface main page, expand the Network dropdown menu.
- Click on the "Network Topology" tab (which will show you the current network topology).
- Click the button "+ Create Network" on the upper-right side of the page.
- Pick a name (for instance "private") then click on the "Next" button.
- Under "Network Address" pick an IP range (for instance "10.65.4.0/24") then click on "Next" button.
- Ensure "Enable DHCP" is selected then click the "Create" button.
- You should be able to see your new network.
How to create a router and connect it to the network:
- On the ScienceCloud Web Interface main page, expand the Network dropdown menu.
- Click on the "Network Topology" tab (which will show you the current network topology).
- Click the button "+ Create Router" on the upper-right side of the page.
- Pick a name (for instance "private-router").
- From the "External Network" menu, select public.
- Click on the "Create Router" button.
- You should now see the router icon connected to the public network.
- Move the mouse over the router and select the "+ Add interface" button.
- In the "Subnet" menu, select the private network and click the "Add interface" button.
- On the "Network Topology" page you should now see that your router connected to both public and private networks.
How to start an instance:
- While launching a new instance, click on the "Networking" tab.
- Select private as the primary interface (assigned to NIC:1).
After starting the instance, you need to associate a floating IP to it.
- On the ScienceCloud Web Interface, expand the Compute dropdown menu and click the Instances tab.
- Find your instance of interest, and from the dropdown menu on the right corresponding to your instance select the "Associate Floating IP" option.
- If an IP is available on the "IP Address" menu, select one of them.
-
If no IP is available on the "IP address" menu, then click on the "+" sign next to "No floating IP addresses allocated".
Please note that if you have not requested an expanded Floating IP Quota a priori, pressing the "+" will not allocate any IP addresses from the pool. Please contact Science IT to request this quota expansion.
- From the "Pool" menu, select public.
- Click the "Allocate IP" button.
- Select the newly allocate IP from the "IP Address" menu.
- Ensure the "Port to be associated" contains the instance name and the correct private IP.
- Click the "Associate" button.
Now the public IP you have chosen is assigned to the private IP of your VM. Remember to update the security groups to open the ports needed to connect to your VM with protocols other than SSH.
Release unused public IPs
Public IPs are a scarce resource. Please release them if you don't need them anymore:
- On the ScienceCloud Web Interface, expand the Compute dropdown menu.
- Open the Access & Security tab.
- Click on the Floating IPs tab.
- For each floating IP you want to release, select "Release Floating IP" from the menu on the right.
More complex networking
This is the best option if:
- You want to replicate an existing complex network setup for testing purposes.
- You need to deploy a distributed service composed of multiple VMs with different roles and needs in terms of network configuration.
You have the ability to create private networks and routers and connect them as you wish. However, since multiple configurations are possible and this use case is not so common, we do not describe it in detail.
If you need assistance on setting up your network configuration, feel free to contact Science IT.