Networking
This page guides you through the available options and helps you decide how to configure your instance's network, depending on your use case.
ScienceCloud implements a networking service that allows you to create complex network setups on the cloud. For basic usage, choose the uzh-only network when creating an instance - your instance will be assigned a UZH-internal IP address.
What you can do with ScienceCloud Networking
You have great flexibility when setting up networking. You can:
- Create instances with more than one network interface
- Add or remove a network interface from an instance that is already running
- Assign a public floating IP to an instance
- Create private networks
- Create routers and connect them to private networks
- Switch a floating IP between instances
General non-exhaustive security recommendations
Please note that based on the Computing Services Agreement you are not allowed to host services for personal or commercial use, but only for research purposes.
Important
ScienceCloud users bear the sole responsibility for maintaining REIM compliance.
Please note that a new paragraph has been added to the REIM. Section 15 "Schutz des Netzwerks der UZH" (1bis) now stipulates that:
"Sämtliche Logins für vom Internet erreichbare Services, Applikationen und Informatikmittel der UZH müssen über einen zweiten Authentisierungs-Faktor verfügen (Multifaktor-Authentifizierung MFA). Allfällige Ausnahmen sind durch den Chief Information Security Officer (CISO) zu bewilligen".
(Unofficial English translation) All logins for UZH services, applications and IT resources that can be accessed via the Internet must have a second authentication factor (multifactor authentication, MFA). Any exceptions must be approved by the Chief Information Security Officer (CISO).
Entry into force on 5.11.2024. Transition period for implementation of 9 months until 31.7.2025.
- Authenticate exclusively with ssh keys
- Disable password authentication in
sshd_config - Never set passwords for service accounts (
uid < 1000) and accounts withsudoprivileges - Use passphrase-protected ssh keys (these passphrases must be long and unique)
- Configure ssh to use two-factor authentication, e.g.
libpam-google-authenticator
- Disable password authentication in
- Expose only the ports and applications necessary for normal operation
- Never expose your backend databases
- If you need to run an admin or management tool, restrict access to connections coming from UZH IP addresses
- Install security updates regularly
- Enable unattended upgrades
- Follow security bulletins
- Manually upgrade applications that do not originate from the configured package repositories
This is not an exhaustive list and more work may be needed to secure your instance. For more information, refer to the ZI list of IT security recommendations (in particular the REIM) or contact the IT security team. If your server configuration is particularly complex and you need consulting, please contact Science IT to see if an expert service agreement is right for you.
Available Networks
By default, there are several pre-configured networks available to ScienceCloud projects: "uzh-only" and "public".
| Name | IP Network | Description | When it should be used... |
|---|---|---|---|
| uzh-only | 172.23.0.0/16 | Private network, routable only within the UZH network | Most computational use cases, when you only need to access your instance to run computational workloads. Also for services that need to be accessed by UZH clients only. |
| External Network VLAN 9 | 10.129.123.0/24 | Public network | For services that need to be contacted from the internet, including public data repositories like OpenBIS or MOOCs (like OpenEdX). You attach an interface from this network to your instance, and then associate a Public Floating IP from the 130.60.9.0/24 network range to it. |
| External Network VLAN 24 | 10.129.192.0/24 | Public network | For services that need to be contacted from the internet, including public data repositories like OpenBIS or MOOCs (like OpenEdX). You attach an interface from this network to your instance, and then associate a Public Floating IP from the 130.60.24.0/24 network range to it. |
| public | 130.60.9.0/24 | Public network | For services that need to be contacted from the internet, including public data repositories like OpenBIS or MOOCs (like OpenEdX). You don't attach your instance directly to this network; instead, you follow the procedure shown for External Network VLAN 9. |
| admin24 | 130.60.24.0/24 | Public network | For services that need to be contacted from the internet, including public data repositories like OpenBIS or MOOCs (like OpenEdX). You don't attach your instance directly to this network; instead, you follow the procedure shown for External Network VLAN 9. |
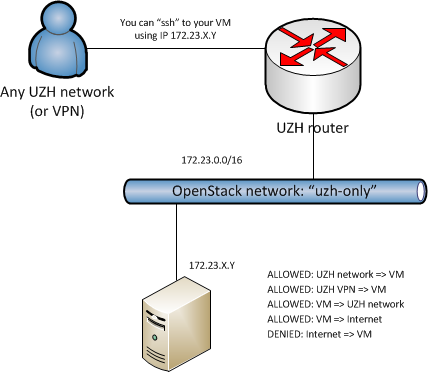
"uzh-only" network
This is the standard network for most instances. It contains a range of IP addresses that are only accessible from incoming traffic from inside the UZH network, that is from computers attached to the UZH network either on campus or via VPN. Outgoing traffic from the instance is not limited.
Assigning an internal IP address
While launching a new instance, select the Networks page, select the uzh-only network, if not already selected.
Public access to your server
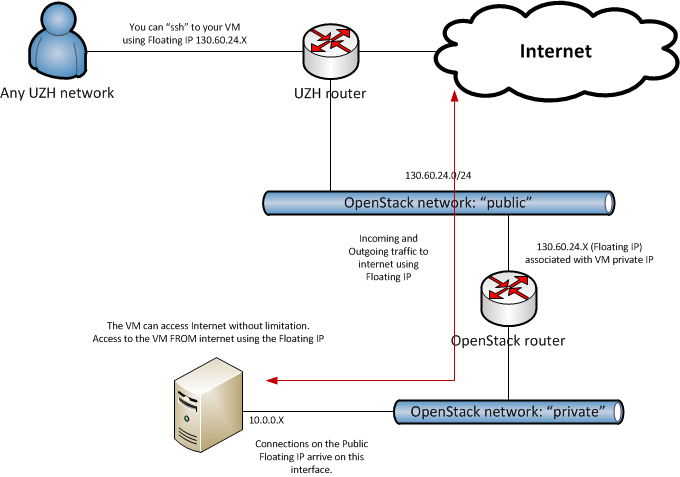
Under certain circumstances, VMs can be made available to the public internet.
Since the UZH public network uses IPv4 and these IPs are intrinsically scarce, the initial quota for the floating IPs on ScienceCloud should only be used when there is a need to serve resources to the public internet. Science IT can provide a limited number of public floating IP addresses for use with web services. However, we strongly recommend that you consider using Web Hosting or Virtual Server Housing services instead. They have higher availability and are better suited for web services than ScienceCloud. If you believe that ScienceCloud is still better suited for your needs, contact Science IT with a description of your use case for a public IP. Once your request is accepted, you will be able to see the available floating IPs from the ScienceCloud dashboard and proceed with the rest of this tutorial.
Note
There is a cost contribution associated with the allocation of each public IP to a project. The reservation uses DHCP, so the IP will be randomly allocated from this range.
Danger
The following instructions assume good technical understanding and provide only a rough outline for the simplest case. Your project may require additional security considerations and more advanced configuration. Please read through all the steps before starting the procedure.
The instructions below describe how to set up a VM with two IPs: internal for SSH and public for public facing services. You would need to use APIs for some of the steps.
- After procuring a public IP, check whether it should be attached to the network V9 (third octet is 9) or V24 (third octet is 24).
- Create a VM with two network interfaces: v9/V24 and uzh-public. Important: you should not associate the public IP at this point.
- Write down the allocated IP addresses on each of the two subnets from the previous step
The following steps should be performed on the VM.
- Find the device name that corresponds to the V9/V24 IP address by running
ip -br a. The device name will be in the first column. In the sample output below, the V9/V24 IP is10.xx.xx.155and the corresponding device name isenp3s0. - Create a directory for custom routing tables:
sudo mkdir -p /etc/iproute2/rt_tables.d - Add a custom table:
sudo bash -c 'echo "200 tbl_enp3" > /etc/iproute2/rt_tables.d/enp3.conf' - Figure out the routes you need to place into the custom table by running
ip -c r. Find the following routes. - connected subnet route for your V9/V24 interface. Note the range. It should look similar to
defaultroute definition for your V9/V24 interface. This should look similar to- Add routes to the custom table. For the first route, you need to take the range from the connected subnet route above and use the V9/V24 IP address as
src. For the second route, you should use theviavalue from the default route above.via - Add traffic rule using the V9/V24 IP address
- Make the routes persistent by adding the following configuration to
/etc/netplan/90-policy-routing.yaml(new file). The first range is the same as the range for the first rule above. TheviaIP should match theviaIP in the second rule above. - Fix permissions by running
sudo chmod 600 /etc/netplan/90-policy-routing.yaml - To test the change run
sudo netplan generatefollowed bysudo netplan try. Then try connecting to the instance from another shell. If connection succeeds, press<enter>to apply changes. - Check the results
ip -c rshould show all routes for the V9/V24 interface have the metric of 500.ip r show table tbl_enp3should show the default route and potentially the connected subnet route. It is normal for the latter to be missing.- Attempt to connect via the uzh-public IP
At this point, we can install and configure the service that needs the public IP. As an example, we will use Apache web server but it should work similarly for other services.
- Install
apache2and verify that it runs correctly, e.g.curl -L http://10.xx.xx.155 | less - Create an OpenStack security group for the web server. It should allow egress to any and ingress only to ports 80 and 443 from any. You can use either the web interface or do it from the command line.
- Assign the web server security group to the V9/V24 interface via OpenStack CLI
- List ports for the instance
openstack port list --server <instance_uuid>. Copy the V9/V24 port's uuid for the next command. - Remove the
defaultsecurity group from the V9/V24 portopenstack port set --no-security-group <port_uuid> - Add the previously created http security group to the V9/V24 port
openstack port set --security-group <security_group_name> <port_uuid> - Associate the public IP address with the V9/V24 interface
openstack floating ip set --port <port_uuid> <public_ip> - Final tests
- ssh to VM via public IP (should fail)
- ssh to VM via UZH IP (should succeed)
- Open the website on the public IP (should succeed)
curl -L http://<public_ip>. Ideally, you should run this test from an external location, e.g. using mobile connection on your phone.
If you create a snapshot and restore it later, it may be necessary to perform some adjustments if you are restoring to a different VM. In such cases, the instance will get a different V9/V24 IP address. Suppose, the new address is 10.xx.xx.34
- Add the connected subnet route as described above but using the new IP. You may need to query it first.
sudo ip r add 10.xx.xx.0/24 dev enp3s0 src 10.xx.xx.34 table tbl_enp3 - Delete the old rule
sudo ip rule del from 10.xx.xx.155 lookup tbl_enp3 - Add the rule using the new IP
sudo ip rule add from 10.xx.xx.34 lookup tbl_enp3 - As described above:
- Generate and validate the configuration with
netplan - Add the web server security group
- Associate the public IP address
- Perform final tests
Release unused public IPs when not in use
This IP range is a scarce resource. Please release them if you no longer need them:
- On the web interface, main page, click on Network on the left menu bar
- Click on the Floating IPs link
- For each floating IP you want to release, from the menu on the right, select Release Floating IP.
Other networks
public and admin24 networks are for administrative purposes only. If you need a public floating IP address, see here.
Default security groups
The table below lists the default security group created for every new project on ScienceCloud.
| Direction | Ether Type | IP Protocol | Port Range | Remote IP Prefix |
|---|---|---|---|---|
| Egress | IPv4 | Any | Any | 0.0.0.0/0 |
| Egress | IPv6 | Any | Any | ::/0 |
| Ingress | IPv4 | Any | Any | - |
| Ingress | IPv4 | ICMP | Any | 0.0.0.0/0 |
| Ingress | IPv4 | TCP | 22 (ssh) | 0.0.0.0/0 |
| Ingress | IPv6 | Any | Any | - |
For detailed instructions on opening specific ports in the instance, please refer to the Training Handout section training / Access specific ports on your instance
Special use cases
Using routers and floating IPs
Inside your project it is possible to define private networks and access external network resources via a private defined router. To do so, the following steps needs to be followed (all actions are done inside your current project):
- If you don't need access to your network from the internet (uzh-only floating IP):
- create a private network
- create a private router
- attach an interface, from the network created earlier, to your router
- (Optional) attach a floating IP from uzh-only network to your instance(s)
- If you need access to your network from the internet (public floating IP), you can adapt the instructions above.
Create a private network
- From the web interface select Network from the left menu bar.
- Click on the button + Create Network on the upper-right side.
- On the Network screen, choose a name, for instance, private, then click Next.
- On the Subnet screen, under Network Address, pick an IP range, for instance,
10.65.4.0/24, then click Next. - On the Subnet Details screen, ensure Enable DHCP is selected, then click Create.
Create a router and connect it to the network
- In the web interface, select Network from the left column.
- Click + Create Router on the upper-right side.
- Pick a name, for instance, private-router.
- From the External Network menu, select uzh-only network provider network.
- Click Create Router. You should now see the router icon connected to the uzh-only network.
- Move the mouse over the router, and select the + Add Interface button.
- In the Subnet menu, select the private network you created earlier, then click the Add Interface button.
Start an instance with the private network interface
- While launching a new instance, from the Networking view, select private as the primary network interface.
- After the instance is created, make a note of the IP allocated to the instance: this will be necessary later.
(Optional) Associate a uzh-only floating IP
- On the main page of the web interface select the Network link on the left column.
- Click the entry Floating IPs.
- If you do not yet have an IP listed, click the button Allocate IP to Project.
- Choose the uzh-only pool (optional, but recommended, enter a description for your IP)
- Click Allocate IP. An IP should now appear in the list.
- Once an IP is available on the IP Address menu, select the button Associate.
- Ensure the Port to be associated contains the instance name and the correct private IP for the instance as noted in the earlier step.
- Click on the Associate button.
Remember to update the security groups to open the ports needed to connect to your instance with protocols other than SSH.
Using public floating IPs
- On the web interface, main page, click on the
Networklink - Click on the
Floating IPslink - Choose the public pool (optional, but recommended, enter a description for your IP)
- For the IP you wish to use, click the
Associatebutton on the right of the IP's row - Create and start your instance with a primary network interface from External Network VLAN 9, or attach an interface from the mentioned network to an existing instance
- Go to Compute->Instances and associate the public IP to your instance (use Associate Floating IP option from the combo list on the right)
Advanced networking
This is the best option if:
- You want to replicate an existing complex network setup for testing purposes
- You need to deploy a distributed service composed of multiple VMs with different roles and needs in terms of network configuration
You have the ability to create private networks and routers and connect them as you wish. However, since multiple configurations are possible, and this use case is less common, we do not describe it here in detail.
If you need assistance with setting up your network configuration, please contact Science IT.